
")
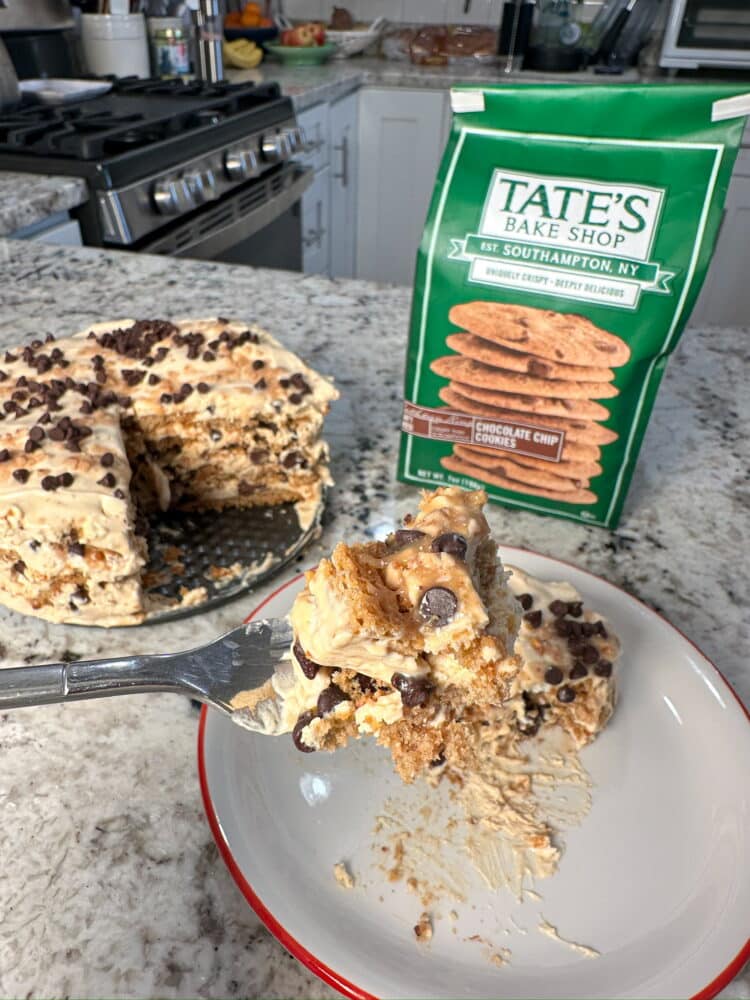
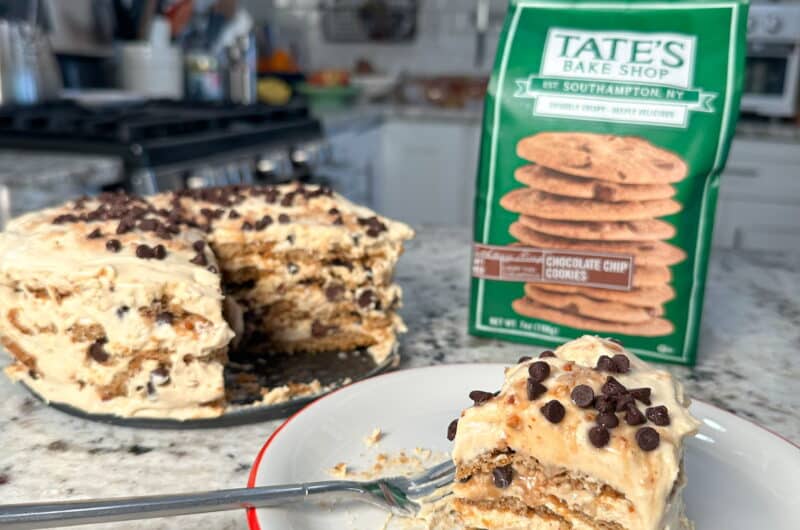
Tate’s Dulce de Leche Icebox Cake

This recipe is a tip of the hat to Ina Garten, who originally taught me how to make an Icebox Cake. Hers also uses Tate’s Cookies, because Ina only uses the best! It is important to know that you will want to make the dulce de leche ahead of time. I suggest making it up to one month in advance, and you can go ahead and make multiple cans because it stays good in your pantry for a few months! I also want to note depending on the size of your pans or amount of layers, you might end up with extra filling but don’t worry I have a solution for that!
YOU WILL NEED
- 2 (14 oz) cans sweetened condensed milk
- Approx 25 Tate’s chocolate chip cookies
- 2 cups heavy whipping cream
- 2 tsp vanilla extract, divided
- 1 tsp salt, divided
- 2 (8 oz) blocks cream cheese, at room temperature
- 1 cup mini chocolate chips
- 1 cup heath bits
- For extra filling if needed: 1 store bought pie crust
TO MAKE
STEP ONE: *Earlier in the day or up to two weeks before*, turn your condensed milk into the dulce de leche. You achieve this by removing the labels from the cans then setting them in a pot making sure they are completely submerged in water. Bring the water to a boil then reduce to a simmer for 3 hours, checking every hour and adding water if the cans are no longer submerged. After 3 hours, remove the cans and allow to cool completely.
Kristen Regis sent me a message on Instagram to note that you can make Dulce De Leche in the Instant Pot!
How to make dulce de leche in the Instant Pot: Remove the labels from the two cans, then set them on their sides in the instant pot. Fill the Instant Pot with water all the way up to max capacity line. Pressure cook for 35 minutes then natural release.
Thanks Kristen!!
STEP TWO: In a medium bowl, use your hand mixer to whip the heavy cream, 1 tsp vanilla, and ½ tsp salt until you get soft peaks, then set aside in the fridge.
STEP THREE: In a large bowl, combine the softened cream cheese, dulce de leche (this is the condensed milk that we boiled to turn into caramel), 1 tsp vanilla and ½ tsp salt and use your hand mixer to combine until smooth
STEP FOUR: Bring out your whipped cream and use a spatula to fold it into your cream cheese caramel mixture
STEP FIVE: Get an 8 or 9” springform baking pan. However, if you don’t have one don’t sweat it! Use a pretty glass bowl if you have one (the layers this dish makes are pretty) or simply make the layers in any baking dish. Depending on the size of your dish, you might get larger layers but less of them, or smaller layers but more of them.
STEP SIX: Layer the bottom of your pan with Tate’s chocolate chip cookies, breaking them if need be to cover the entire bottom.
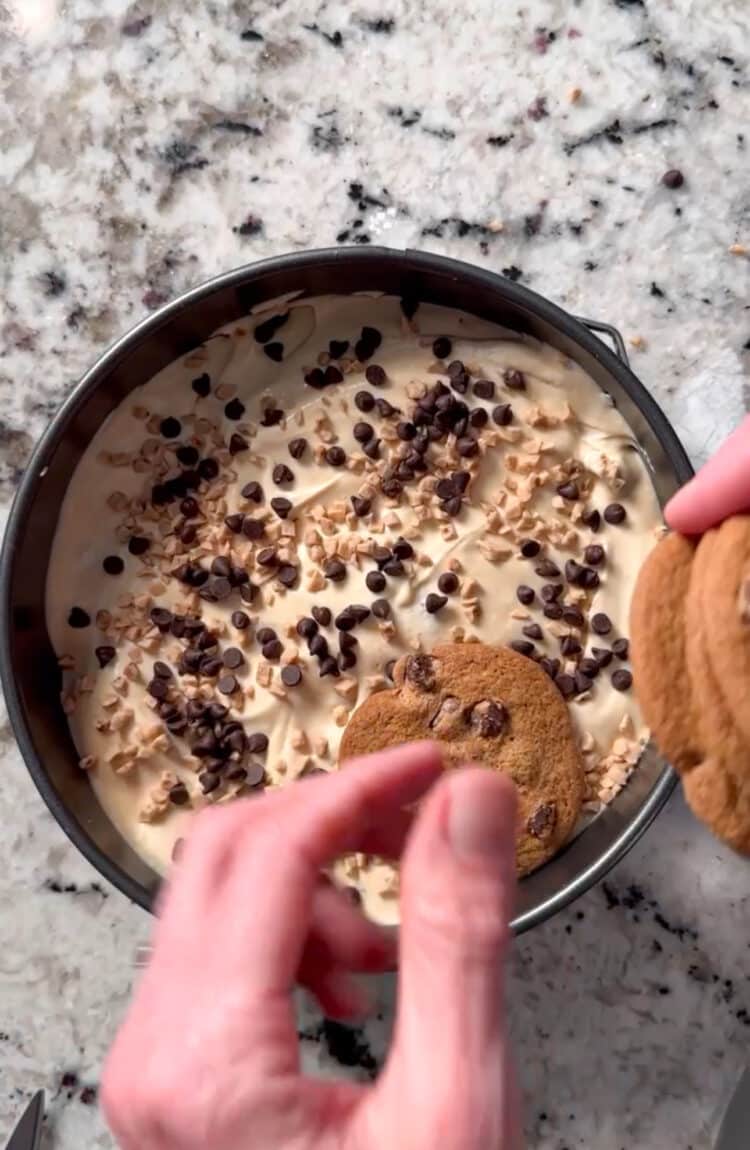
STEP SEVEN: Add a layer of your creamy filling followed by a sprinkle of the mini chocolate chips and heath bits.
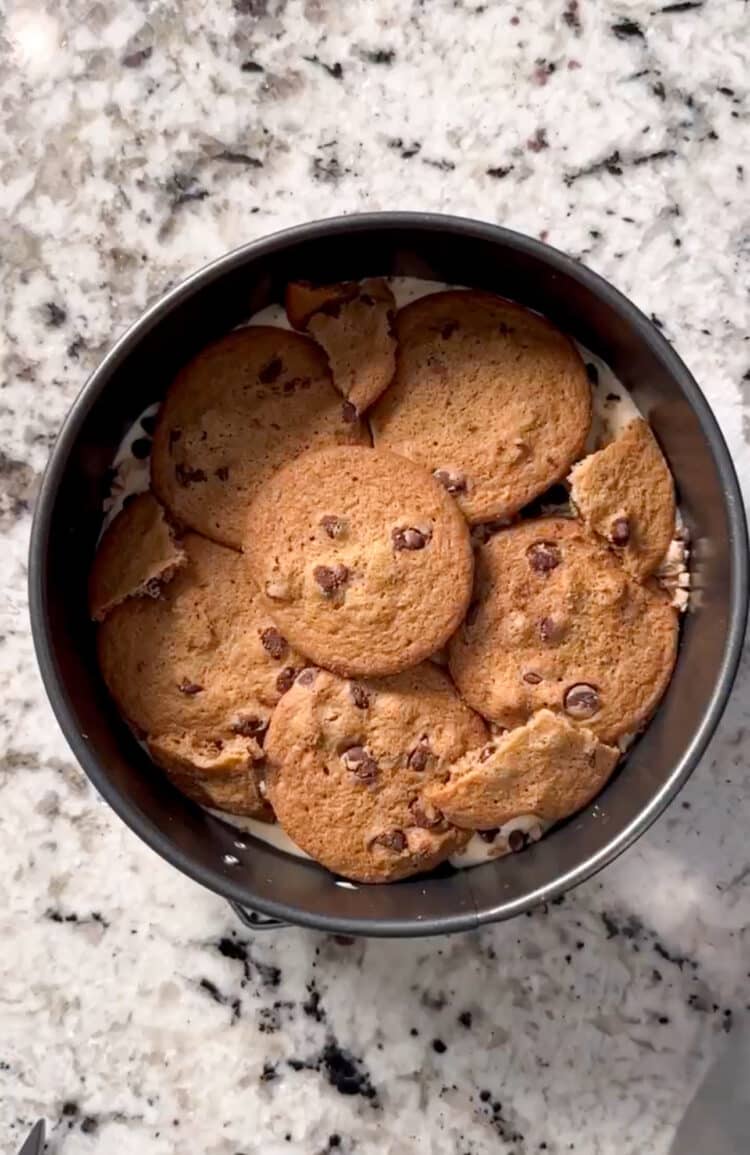
STEP EIGHT: Repeat steps 6-7 for as many layers as you can fit. (If you have extra filling, don’t worry, I have a plan!!)
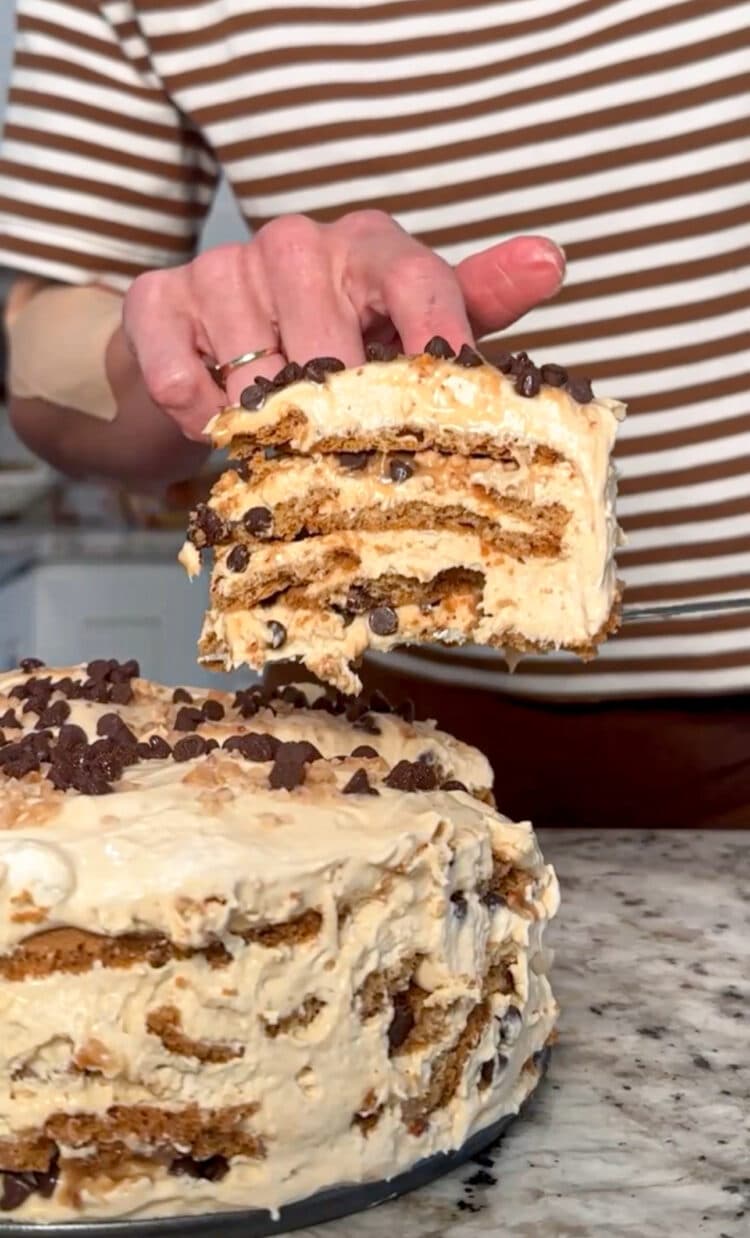
STEP NINE: Cover your dish with plastic wrap using toothpicks if needed so the wrap doesn’t get stuck to your top layer and refrigerate overnight.
STEP TEN: The following day, bring out your dish and carefully remove it from the springform pan. Cut into the most decadent, gorgeous cake you have ever seen!
FOR THE EXTRA FILLING:
The last thing I wanted was for you to run out of filling, and I knew there was a great option for the extra that would leave you with another dessert for later. Win, win!! Here’s what you do:
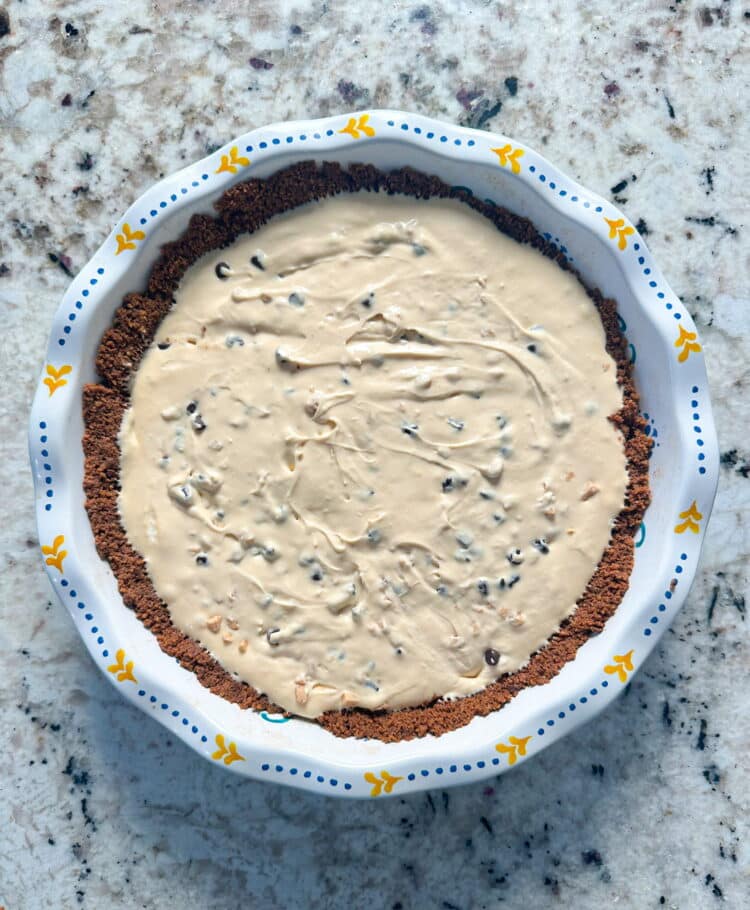
Take your extra filling and add a handful of both the mini chocolate chips and heath bits and stir. Then, pour this into your pie crust. If eating soon, stick this in the refrigerator to set for at least an hour. But know you can also freeze this for later! Simply cover in plastic wrap or foil followed by a freezer ziplock and be sure to label. The night before you want to eat it, transfer to the fridge to thaw.
Tate’s Dulce de Leche Icebox Cake
Course: Sweets8
servingsIngredients
2 (14 oz) cans sweetened condensed milk
Approx 25 Tate’s chocolate chip cookies
2 cups heavy whipping cream
2 tsp vanilla extract, divided
1 tsp salt, divided
2 (8 oz) blocks cream cheese, at room temperature
1 cup mini chocolate chips
1 cup heath bits
For extra filling if needed: 1 store bought pie crust
Directions
- *Earlier in the day or up to two weeks before, turn your condensed milk into caramel. You achieve this by removing the labels from the cans then setting them in a pot making sure they are completely submerged in water. Bring the water to a boil then reduce to a simmer for 3 hours, checking every hour and adding water if the cans are no longer submerged. After 3 hours,remove the cans and allow to cool completely. To do this in the Instant Pot, see note below.
- In a medium bowl,use your hand mixer to whip the heavy cream, 1 tsp vanilla, and ½ tsp salt until you get soft peaks, then set aside in the fridge.
- In a large bowl, combine the softened cream cheese, dulce de leche, 1 tsp vanilla and ½ tsp salt and use your hand mixer to combine until smooth
- Bring out your whipped cream and use a spatula to fold it into your cream cheese caramel mixture
- Get an 8 or 9” springform baking pan. However, if you don’t have one don’t sweat it! Use a pretty glass bowl if you have one (the layers this dish makes are pretty) or simply make the layers in any baking dish. Depending on the size of your dish, you might get larger layers but less of them, or smaller layers but more of them.
- Layer the bottom of your pan with Tate’s chocolate chip cookies, breaking them if need be to cover the entire bottom.
- Add a layer of your creamy filling followed by a sprinkle of the mini chocolate chips and heath bits.
- Repeat steps 6-7 for as many layers as you can fit. (If you have extra filling, don’t worry, I have a plan!!)
- Cover your dish with plastic wrap using toothpicks if needed so the wrap doesn’t get stuck to your top layer and refrigerate overnight.
- The following day, bring out your dish and carefully remove it from the springform pan. Cut into the most decadent, gorgeous cake you have ever seen!
Notes
- To make the caramel/dulce de leche in the Instant Pot: Remove the labels from the two cans, then set them on their sides in the Instant Pot. Fill the Instant Pot with water all the way up to max capacity line. Pressure cook for 35 minutes then natural release.
#ad @tatesbakeshop


I can’t wait to make this for my family! Thank you for sharing!🥰
How do you store the caramel? In the can for 2 weeks in the pantry? In the refrigerator in a separate container?
In the can in the pantry!
Looks so delicious and I know my friends will love it!
hello
dying to make this recipe.
does the dulce de leche stay fresh in the can ? where do i put it. fridge or pantry
thank u
great recipe
AFter you make the dulce de leche it is shelf stable still so long as you don’t open the can!
I need a gluten-free dessert for Easter and Tate’s has gluten-free cookies. So excited to make this! How far in advance can it be prepared and it still be good?
It lasted well in our fridge for a few days!
This looks amazing.. will be on the table for Palm Sunday.. a trick I recently learned for a sturdy whipped cream is add a couple spoonfuls of instant pudding.. whips in a fraction of the time and remains fluffy.
The instant pot is taking a long time to cook and there was liquid overflow. Any idea if anyone sees this comment?
Oh no Jess did this method and didn’t have any issues. Did it turn out OK?
Of course as I post this it starts cooking haha
Can you make this with the pull type top of the sweetened condensed milk?
Yes
Can you freeze the cake?
I’d like to know the same? Does this cake freeze ok? Just overnight because we have an hr drive next day thought freezing would make it travel easier in an ice chest ?
I haven’t personally tried but based on the components, I think it would do great frozen.
What kind of pie crust for the left over?
I’ve got the same question 🙂
Just a standard pie crust! Though a cookie or graham cracker crust would be amazing.
Can you just use dulche de leche in the pre made can?
Sure!
Can you use Nestle canned Dulce de leche?
I have not tried this but I don’t see why not!
Can you make this in small dessert cups?
Sure!! One cookie in between each layer?
I can buy dulce de leche condensed milk! Is this the same? In other words can I skip this step? Thx in advance.
Hmm that’s a good question. Maybe! The goal is for it to be a caramelized sweetened condensed milk.
How many bags of Tate’s cookies do I need?
2-3
This looks so good! Does it need a full 24 hours in the fridge or can I make it first thing in the morning and serve that eve?
I think it would be fine by the evening!
Made this last night and the whole family loved it. Definitely has a carmel cheesecake like taste to it without having to bake it! We ate it both refrigerated and frozen and it tastes good both ways. Definitely serves more than 8 IMO. So so good!
Ah yay I am so glad to hear this!! I agree it does serve more than 8 depending on the sizes of the slice!
I made this and it was delicious, the whole party was raving about it. I want to make the dulce de leche again and give it as a gift in a nice jar. I was wondering how long it lasts after opening, and should it stay in the fridge? Thank you!
I made this for Thanksgiving and the flavor was great, but the filling was a bit runny. I’m going to re-try this weekend because I think I didn’t heat my condensed milk long enough and maybe didn’t whisk my cream long enough (who knows). I made the pumpkin icebox cake and it turned out perfectly!
It would really be helpful to have a photo of what the dulce de leche should look like, or a description of the consistency. Thank you!
When making in the instant pot to make the caramel. Do you pressure cooke on low or high temp?
I’m making this for Easter because I’ve been eyeing it on IG for weeks! Question about storage after and how long leftovers may last? THANK YOU!
Love this cake! FYI: as of April 2026, Tates cookies are a lot smaller than they used to be. More like 2.5 inches across. To get the same results as this recipe, you’ll need about 8-10 more cookies!
For the dolce de Leche, can you use the dolce de Leche milk based caramel made by Nestlé, which is right next to the condensed milk in the same aisle?